SkydropX Git Workflow
We use our own git workflow that allows us to launch features regularly. We take the best of Gitflow and Github flow to create a workflow that works with our team and our company.
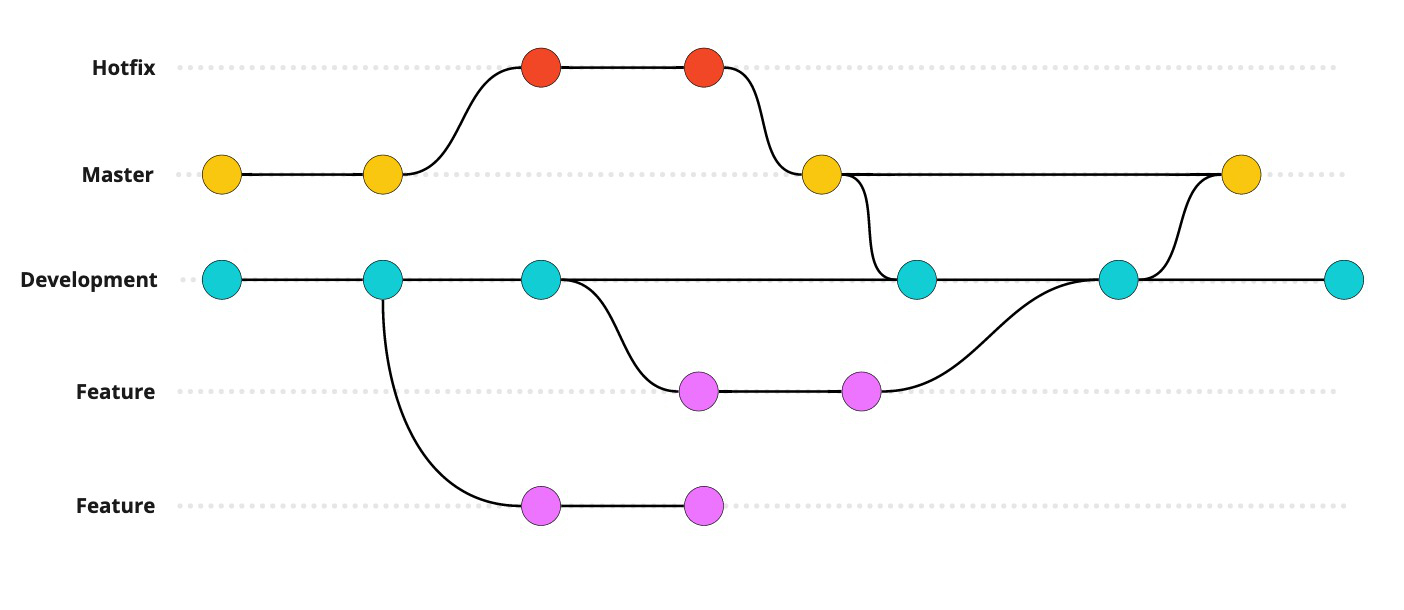
We have our main branch master where all the code in that branch is ready to deploy and we have our work in progress branch development where we add features that will be deployed at the same time on a specific date.
Branches
Naming convention
The branch naming is very important to tell everyone in the team what does your changes do.
We follow the simple structure:
{type-of-branch}/{short-description-of-your-changes}
E.g:
feature/add-login-screen
In the previous example feature is the type of branch and add-login-screen is the short description of that feature.
As you can see the short description should be brief and should explain what those changes will do.
Note: you should use dashes (-) to split every word.
There are 4 types of branches:
- feature
- hotfix
- refactor
- chore
Feature Branches
Every new feature should have its own and unique branch. Feature branches use development branch as their parent branch. When a feature is completed, it gets merged back into development branch and then merge development into master. Features should never interact directly with master.
Creating a feature branch
 master-> git checkout development
 development-> git checkout -b feature/branch-name
Finishing a feature branch
When you are done with the development work on the feature, the next step is to merge the feature branch into development branch.
Important: You should always rebase the development branch on the feature branch before merging since it could be newer commits that your branch may not have.
 feature/branch-name-> git checkout development
 development-> git pull origin development
 development-> git checkout -
 feature/branch-name-> git rebase development
Create a PR and wait for the review.
Hotfix Branches
After finishing feature branch and merge with master, if you get a bug you should create a hotfix branch. It must be always created from master branch
Creating a hotfix branch
master-> git checkout -b hotfix/branch-name
Finishing a hotfix branch
When you are fixed the bug, the next step is to create a PR from your branch into master and wait for the review.
Once the changes was merged in master branch you should create a PR from master to development in order to sync all the changes into development branch.
Refactor Branches
You should create a refactor branch when the changes that you’re making are improvements for the existing features. Refactor branches use development branch as their parent branch. When a refactor is complete, it gets merged back into development branch. Refactors should never interact directly with master.
Creating a refactor branch
 master-> git checkout development
 development-> git checkout -b refactor/branch-name
Finishing a refactor branch
When you are done with the development work, the next step is to merge the refactor branch into development branch.
Important: You should always rebase the last changes of development branch on the refactor branch before merging since it could be newer commits that your branch may not have.
 feature/branch-name-> git checkout development
 development-> git pull origin development
 development-> git checkout -
 feature/branch-name-> git rebase development
Create a PR and wait for the review.
Chore Branches
You should create a chore branch when the changes that you’re not changing the production code and you’re updading config files, libraries, tools, build adjusts and so forth. Chore branches use master branch as their parent branch. When is complete, it gets merged both into master and development branch.
Creating a refactor branch
master-> git checkout -b chore/branch-name
Finishing a chore branch
When you are done with your changes, the next step is to merge the chore branch into master and wait for the review.
Once the changes was merged in master branch you should create a PR from master to development in order to sync all the changes into development branch.
Pull Requests
Once your branch is ready to review you should create a pull request. Ensure the PR description clearly describes the problem and solution. Include a relevant screenshot if applicable.
The PR name must follow the following naming convention:
[{ISSUE_ID}] {short description of your changes}
E.g:
[PROY-123] Fix shipments tracking dashboard
The project Tech Lead will merge it when is approved.
Always test your code locally before create a pull request. Make sure that your changes are ready for production. CI is not for experimental usage
Commits
Make small, single-purpose commits
By committing only small sections of code, everyone on your team can quickly understand what work has been completed. And if something goes wrong, smaller commits make it easier to revert bad check-ins, which helps you maintain a stable codebase.
Write short, detailed commit messages
When writing a commit message, start with a short summary of your change. Write your summary in present tense, limit the subject line to 50 characters.
Keep in mind that your team members will need to be able to read this message and understand exactly what you have done. Make sure that you provide enough detail to answer:
- What changed from the last version?
- How did it resolve the issue?
- Why did you make the change?
Some bad examples are:
- 👎 Add x library
- 👎 Fixed a bug.
- 👎 Refactored X and Y. Added files, remove z file
- 👎 I’m trying to be funny with my commit message
Some better examples include:
- 👍 Add x library to send automated SMS
- 👍 Add search for username in group view
- 👍 Fix dynamic field init method to show status
- 👍 Small changes to text editor to enhance user experience
Rebase your working branch frequently
It’s crucial always to keep your branch rebase with the latest code. Writing new code upon obsolete one is useless. It is as meaningless as fixing a bug that may already be fixed.
You should rebase your working branch frequently to prevent bugs, rework, and the tedious job of resolving conflicts with the upstream branch. You can do it easily by running these commands:
git checkout <upstream_branch>
git pull
git checkout -
git rebase <upstream_branch>
Adequately configure the commit authorship
You should at least set your name and email address correctly. As commits are communications tools, knowing who made a specific change can help you in the future.
Commit just code, use gitignore wisely
If you’re using an IDE for coding, you should add its files to the .gitignore so when you make a commit these files shouldn’t be add it.
You should never include sensitive data in a commit (e.g credentials, certificates, secrets, tokens, etc).